I need help in understanding this issue regarding simulating a center plane from a datum feature related to an external width dimension: let's say a width dimention is defined as a primary datum feature. When using a vise-like physical datum feature simulator with two almost parallel faces that close on the part, unless the tangent planes on both sides of the datum feature are perfectly parallel (and in the real world they're not), one of the vise faces will act similar to a primary datum plane - touching on 3 high points, and the opposite face will touch on only one point, similary to a tetriary datum plane. Now, depending on which side of the datum feature will make the more stable contact with the simulator, we might get a different separation width between the vise faces, and therefore the simulated datum plane will also be different. For example, if the measurement set up has the vise faces oriented horizontally, the side of the datum feature facing down will orient the part in the fixture, and if you flip the part upside down for a repeated measurement you might get different results on whatever control called out that datum. Now, I understand that there is only one "actual mating envelope" to the datum feature per ASME and only one of the sides facing down will produce the "minimum separation" condition per fig. 4-13, But that means that you have to mount the part twice in the fixtute and re-check your results, and I somehow doubt that this is the recommended practice... on the other hand, if the vise is oriented vertically, we will have no control over which side we stabilize better in the simulator - which is even worse. Everyone's insight will be much appreciated... Thank you!
Navigation
Install the app
How to install the app on iOS
Follow along with the video below to see how to install our site as a web app on your home screen.
Note: This feature may not be available in some browsers.
More options
Style variation
-
Congratulations MintJulep on being selected by the Eng-Tips community for having the most helpful posts in the forums last week. Way to Go!
You are using an out of date browser. It may not display this or other websites correctly.
You should upgrade or use an alternative browser.
You should upgrade or use an alternative browser.
Simulating a datum center plane 2
- Thread starter semiond
- Start date
- Status
- Not open for further replies.
CheckerHater
Mechanical
greenimi,
if you see logic there, can you give an example? Maybe with the sketch?
"For every expert there is an equal and opposite expert"
Arthur C. Clarke Profiles of the future
if you see logic there, can you give an example? Maybe with the sketch?
"For every expert there is an equal and opposite expert"
Arthur C. Clarke Profiles of the future
Hi All,
Lots of sub-topics within this thread.
Here are some thoughts on the similarities and differences between cylindricity and total runout:
The standard uses some unfortunate wording in the cylindricity definition. It mentions a common axis, but only for the definition of "cylindricity" which is just the condition of being perfectly cylindrical. The cylindricity tolerance zone is defined as two concentric (the term should be "coaxial") cylinders (with no mention of an axis) within which the surface must lie. It then goes on to mention that cylindricity applies simultaneously to both circular and longitudinal elements, without mentioning elements in the definition or requiring that elements be established at all. Lots of red herrings here - the definition mentions a common axis, circular elements, and longitudinal elements but none of these are actually required! So at the end of the day cylindricity can be applied and inspected without using or defining an axis. It's two coaxial cylinders - we can imagine an axis down the middle, but we don't have to.
When total runout applied to a cylindrical feature, the tolerance zone amounts to two coaxial cylinders that are also coaxial to a datum axis. I would say that the self-referencing total runout tolerance in CH's figure B would apply a control very similar to, but not exactly the same as, cylindricity. There are cases in which the measured cylidricity is slightly better than the total runout w.r.t the UAME axis (in other words, the UAME axis is not necessarily the optimal axis for getting the 2 coaxial cylinders as close together as possible). If there were no datum reference (and I know that Y14.5 does not allow this) then the total runout control would be exactly the same as cylindricity. Cylindricity is equivalent to total runout with an arbitrary "datum" axis (I suppose that it's not really a datum axis if it's optimized). I would like to see Y14.5 allow total runout tolerances to be specified on groups of features without any datum references - I think that this would make more sense than the partially self-referencing C-D scheme in figures 9-4 and 9-6.
Evan Janeshewski
Axymetrix Quality Engineering Inc.
- Thread starter
- #104
CheckerHater said:semiond,
Do you understand difference between parallelism and flatness? One has datum, another doesn't?
Well, it's the same. Cylindricity is runout without datum. If it has datum, it's not cylindricity.
End of story.
Here is the difference:
Flatness tolerance zone: Two parallel planes "x" apart are just that. They don't define anything else.
Cylindricity tolerance zone: two coaxial cylinders with radial distance of "x", automatically define a common axis. The standard doesn't define this axis as a "datum" and rightly so (i hope an explanation not needed here). But that's samantics. This axis behaves like the datum would behave for the control you showed in fig.B of your sketch.
semiond said:Cylindricity tolerance zone: two coaxial cylinders with radial distance of "x", automatically define a common axis.
Evan summarized excellent the "axis" issue. NO axis needed.
....the definition mentions a common axis, circular elements, and longitudinal elements but none of these are actually required! So at the end of the day cylindricity can be applied and inspected without using or defining an axis. It's two coaxial cylinders - we can imagine an axis down the middle, but we don't have to.
As I stated before any axis can be used.
- Thread starter
- #106
3DDave said:semiond, none of the others has any relation to the problem as stated. Unless they are part of the problem they should be ignored.
None of them should be ignored. As i already said somewhere in this thread, the the center bore should be the socondary datum for location of the holes and the keyslot should be the tetriary for orientation of the pattern around the central axis. A 4th datum that is not part of the DRF might be used (if no other choice left) to qualify the primary datum feature - which must be the width. If i want to stay with just 3 datums a more elegant solution should be found. Pmarc's suggestion is another option. With that said, tightening the size tolerance on the datum width and relying on rule #1 + dimensional tolerance to take care for perpendicularity is not an option because it will not be well recieved. The whole point of switching to proper GD&T is loosening tolerances, and making production easier and cheaper.
semiond -
Unless those participate in the "Simulating a datum center plane" process they should be ignored in a discussion on the topic of "Simulating a datum center plane" to avoid being bogged down with irrelevant detail.
As far as I can tell the feature you want to use as a primary datum feature is garbage and you want a drawing fix that will make it not be garbage. To be elegant, the solution needs to work; your current solution doesn't.
The whole point of Dimensioning and Tolerancing, and FCFs in particular, is to help make better predictions of how parts will fit and function and to be more precise in the descriptions so that those predictions can be realized. Often it makes production more expensive and more difficult, but the end product uniformly performs as expected so the end product is better. In many cases, it requires tolerances to be decreased/tightened because the benefits of doing so can be seen directly in the performance of the part and results in the elimination of later, costly, time-consuming custom adjustments.
- Thread starter
- #108
axym said:Cylindricity is equivalent to total runout with an arbitrary "datum" axis
I think it would be nice to see a sketch describing a situation, where the optimized axis for cylindricity inspection is not the same as the axis of the AME. I guess it's possible, but i personally have a hard time imagening this.
- Thread starter
- #109
3DDave said:Unless those participate in the "Simulating a datum center plane" process they should be ignored in a discussion on the topic of "Simulating a datum center plane" to avoid being bogged down with irrelevant detail.
Notice how i didn't mention the datum reference frame issue and the other datums of the part until i got suggestions to replace the center plane with a planar datum or marking parts, while the topic was all along- "simulating datum center plane". I didn't ignore those suggestions though, i should have?
As for your last paragraph, i certainly agree with it, but what i wanted to say earlier on this matter is a little different from what came out. Here is a second try - If the functionality and the quality of a product are already established and ensured by less recommended dimensioning methods, switching to GD&T should by accompanied by the opportunity to save on costs and making the production more effective, while insuring the same, or even better quality by addressing the functionality of the part more directly in the drawing, allowing to loosen tolerances on some controls. That is why tightening a tolerance on a feature of size where the function does not directly require it, just to make a simulation of a center plane more repeatable, will not be readily accepted.
semiond,
One example is a cylinder produced with a flat on one side, like a D shape:
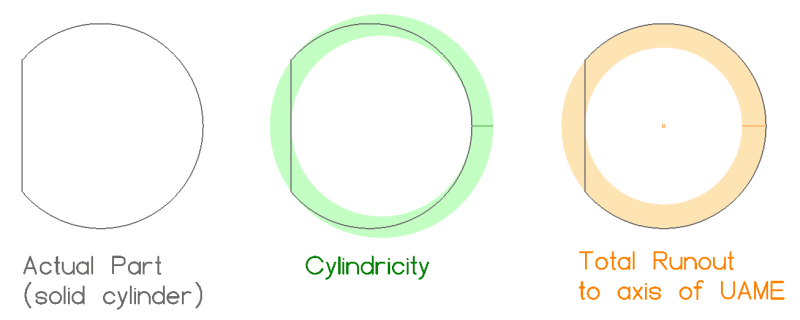
The total runout zone is slightly thicker than the cylindricity zone.
Evan Janeshewski
Axymetrix Quality Engineering Inc.
One example is a cylinder produced with a flat on one side, like a D shape:

The total runout zone is slightly thicker than the cylindricity zone.
Evan Janeshewski
Axymetrix Quality Engineering Inc.
semiond,
Here's another, where the (solid) cylinder has a low spot at one end:
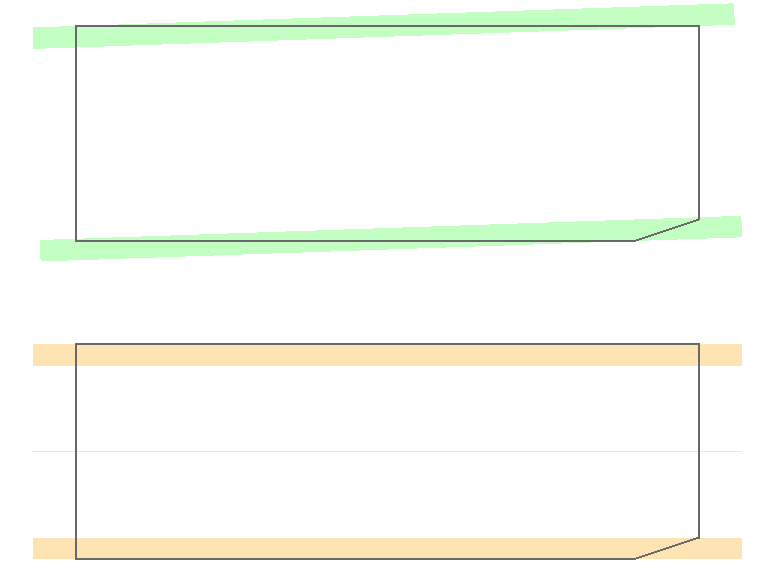
The total runout zone (orange) is very slightly thicker than the cylindricity zone (green).
Evan Janeshewski
Axymetrix Quality Engineering Inc.
Here's another, where the (solid) cylinder has a low spot at one end:

The total runout zone (orange) is very slightly thicker than the cylindricity zone (green).
Evan Janeshewski
Axymetrix Quality Engineering Inc.
pmarc
Mechanical
- Sep 2, 2008
- 3,248
CH, thank you for the reference to ISO R 1101.
Evan, thank you for the sketches showing the subtle difference between cylindricity and what CH shown in his figure B. Also, I am tempted to explore the topic of datumless parallelism in more details, because I see how it could be useful (and not only in applications where planar faces are considered), but I do not think it would be good idea to do this in this thread.
Going back to the main topic, I still do believe that my proposal with two parallelisms wrt to the width centerplane, although like I said at the beginning looks weird, is not a self-referencing, and there is nothing in the standard that would make it illegal. By the way... it is interesting, but it seems like the datum self-refencing example from Alex Krulikowski's handbook will be introduced to the new version of Y14.5 as legitimate practice.
And to be clear, I am not suggesting that this (my idea or what Alex does not like) is something that should be commonly used. I am saying this is something that is interpretable if only some fundamental rules/definitions defined in Y14.5 are followed/used in the process of decoding the requirements. Granted, there are much more common and straightforward ways to express the requirement for parallelism of two faces, but if someone really wants to use as genereous tolerances as possible, my proposal or even Evan's suggestion to use datumless parallelism (which is of course now illegal per the letter of the standard, but not necessarily should be) should be considered.
And for what it is worth, I stand by my definition of datum self-referencing. According to it, the total runout from CH's figure B is not datum self-referencing callout because, like I said before, the datum axis is derived from UAME of the cylinder and the runout verifies surface of that cylinder. These are two related, but different, entities.
On the other hand, the example of datum self-referencing would be position or parallelism callout associated with size dimension of that cylinder wrt to the datum axis - there is no point in inspecting position or parallelism of the axis of the cylinder if this axis is the datum axis; the result of the measurement will/must always be 0.
I assume that this self-parallelism requires a simultaneous requirement so that opposite sides are inspected in one orientation? An orientation that will not be reproduced in the next assembly?
I would also like to see a real application that drove the need for this interpretation.
I would also like to see a real application that drove the need for this interpretation.
- Thread starter
- #114
Evan, those sketches are very helpful, thank you.
I no longer stand by my initial statement that what CH described is "exactly" a cylindricity control. But i agree with pmarc that the reason that it is not legitimate is not the self referencing issue.
3DDave,
A cutter for a horizontal milling machine.
I no longer stand by my initial statement that what CH described is "exactly" a cylindricity control. But i agree with pmarc that the reason that it is not legitimate is not the self referencing issue.
3DDave,
A cutter for a horizontal milling machine.
- Thread starter
- #116
- Thread starter
- #117
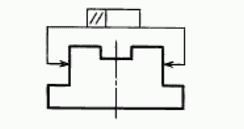
The above is one of the pictures presented by CH.
I now realize what maybe happened many years ago:
Someone seen this callout and thought - why waste space in the drawing for those leaders (broken lines with arrows) connecting the FCF with the features? Let's place the datumless FCF under the width size dimension. If you know this must be done only when controlling a center plane or an axis - you get confused.
This is regulary done in my workplace to this day, but i have also seen it on drawings of some customers (hope thay didn't learn it from us) anyone else ever encountered this?
- Thread starter
- #119
semiond - I know what a slotting cutter is and that it can be installed so it cuts or turned around so that it destroys itself - therefore it is not symmetrical. Which means there is not a problem telling an inspector to inspect it in a certain orientation.
No answer on the holes? I've never seen one with holes. Why would you call them holes if they are cutting teeth?
No answer on the holes? I've never seen one with holes. Why would you call them holes if they are cutting teeth?
- Status
- Not open for further replies.
Similar threads
- Locked
- Question
- Replies
- 14
- Views
- 4K
- Replies
- 21
- Views
- 22K
- Replies
- 8
- Views
- 13K
- Locked
- Question
- Replies
- 80
- Views
- 4K
- Question
- Replies
- 25
- Views
- 25K
