Continue to Site

Eng-Tips is the largest engineering community on the Internet

Intelligent Work Forums for Engineering Professionals

  • Congratulations waross on being selected by the Eng-Tips community for having the most helpful posts in the forums last week. Way to Go!

Aluminum Weldment Design Help 4

Status
Not open for further replies.

Andre3

Mechanical
Mar 2, 2019
53
I have recently moved from a mechanical design role into engineering at my small R&D company figured I would try reaching out to you folks for some help and direction as I do not have other colleges to consult with. I am looking to design a weldment between two 6061-T6 components supporting a very strong solenoid magnet. This had been a bolted connection but the bolts failed after the system was overloaded and now we would like to weld them together for a stronger, permanent connection. My thought was to chamfer the parts to make for a groove weld to hold them together but I am mostly unfamiliar with weldment design.

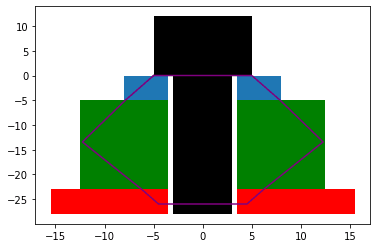
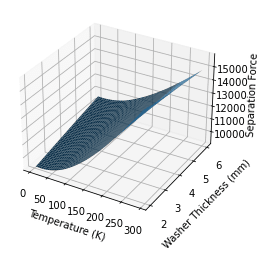
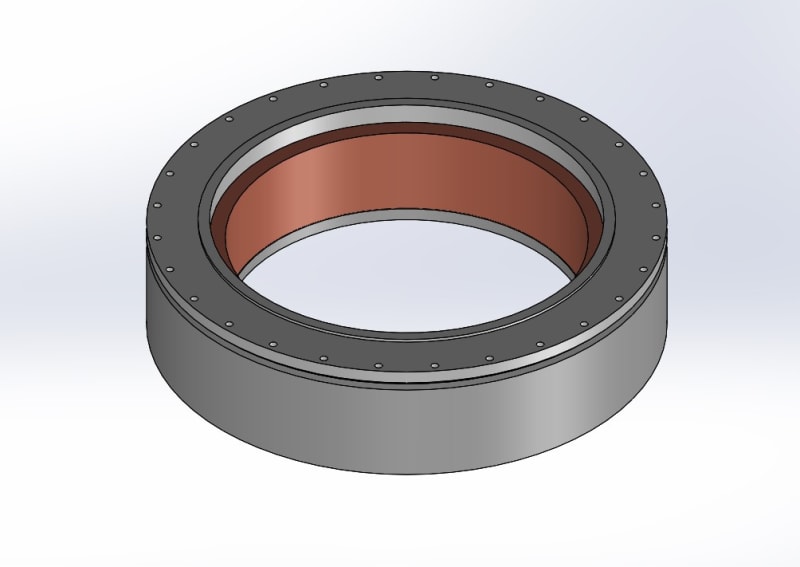
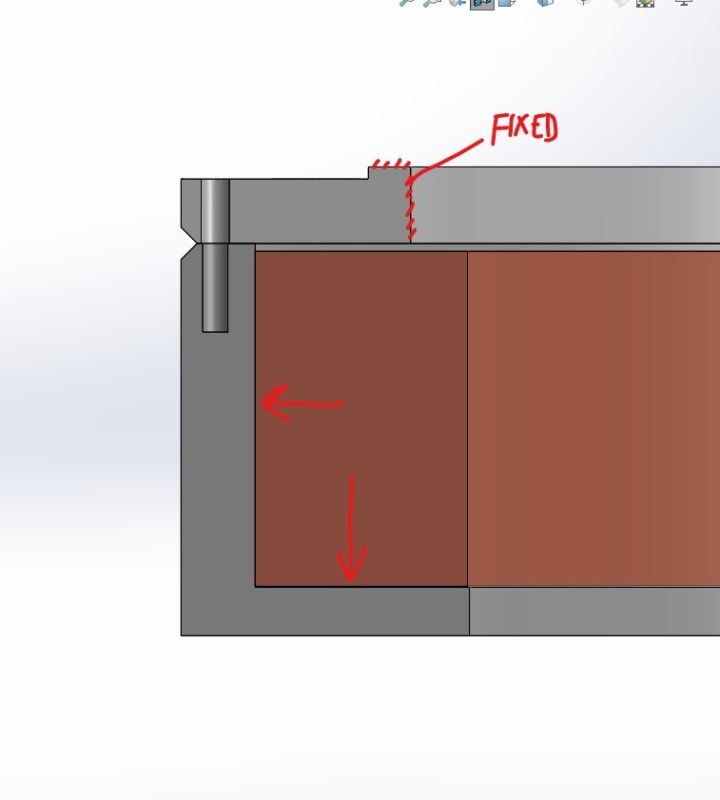
From what I have seen it looks like to be conservative I can expect the welded area to behave like 6061-O which is dramatically weaker. There is an axial magnetic force of about 250 kN downward and an outward radial force that is still being evaluated, for now I am treating it as 0.5 MPa acting on the inside wall of the support. Where should I start with evaluating the stress experienced at the weld and how it will behave? I have attached some snips of a simplified model for discussion.

coil_and_bobbin_t3fzkh.jpg

cross_seciton_snip_mtc94x.jpg
 
Replies continue below

Recommended for you

Hi Andre3

Have just read your post and I need some time to think about what you have said, however the first two things I would say is that a nut factor of 0.2 seems a bit high if you are lubricating threads, also because of the error in torquing up the bolts it’s usual to do practical tests ie torque some rings up with a set methodology the you need to follow each time and then test the rings to see what force they separate and then adjust the torque etc.
Can you share your calculations?, have you increased the number of bolts?
I realise you would have to test at room temperature and then calculate down to the service temperature so I know of no other way.
One other possibility is to use studs in the ring joint and tension them with a bolt tensioner which is accurate to within about 3%.
I wonder if you can use load indicator washers but not sure they are suitable for sub zero temperatures.

Does the aluminium alloy increase in strength when it’s cooled if so if you avoid embedding at room temperature then you should be okay at the sub zero temperature because the preload relaxes.


“Do not worry about your problems with mathematics, I assure you mine are far greater.” Albert Einstein
 
Here is the current state of the design:
-56 bolts preloaded to 10.5 kN
-3mm thick invar washer, 12mm OD
-2 mm counterbore in bobbin before threads

I am calculating the joint stiffness in steps from room temperature down to 3 K using the NIST data, the joint constant at room temperature is .308.
At 3K the calculated separation load is 9148 N per bolt.
Here is the frustum that I am using in the calculation and an interesting 3D plot of the separation force vs temp and washer thickness:
bolt_and_frustum_n7z0lp.png

3D_separation_force-washer_bdsol2.png


I am still tweaking it though. The changes I am working on now are:
-changing the final frustum diameter to 2D instead of 1.5D to account for the helicoil
-redefine the joint stiffness to account for a truncated frustum due to the flange thickness (18.4mm)
 
If possible I would like to stick with tightening the bolt with an input torque, in its assembled state we wouldn't have space for a hydraulic tensioner or anything like that. The aluminum contracts more so unless you make a very thick washer, the preload goes down with temperature. I am not sure how load indicating washers would impact the stiffness here, but I cant use any magnetic materials so I think they are likely not an option. Also can you share your calculation for embedding?
 
Hi Andre3

Thanks for the update, how much preload are you left with at 3K? You have said that the separation force at 3K is 9.148KN per bolt and therefore that exceeds the external force by a factor of 2 so I would say that was safe, however my approximate calculation suggested you would need a preload of 15KN at room temperature to enable you to achieve a 8KN preload at 3K, so how come your figure is much lower than mine?


“Do not worry about your problems with mathematics, I assure you mine are far greater.” Albert Einstein
 
Hi Andre3

Only just seen your post it must of crossed with mine, I will try and get some calcs on about the embedding but need dimensions of the washers mainly the diameter otherwise I only have embedding figure for bolt without washer.

“Do not worry about your problems with mathematics, I assure you mine are far greater.” Albert Einstein
 
desertfox

At 3K there is still 6.35 kN of preload left, that is possible because of the invar washer. The washer is reducing the total thermal contraction of the joint to more closely match the bolt and therefore looses less preload. If the washer was very thick, over a centimeter, the preload would increase with decreasing temperature because the bolt would contract more than the joint.
 
desertfox

The proposed washer in this example has an OD of 12mm, and ID of 7mm and is 3mm thick.
 
Hi Andre3

I can explain the embedding calculation, assume no washer and so the bolt clearance is hole 7mm diameter and the bolt head is 10mm diameter. Therefore area of bolt head in contact with aluminium ring is -


Pi*(10^2 -7^2 )/(4)= 40mm^2

Now using aluminium alloy at room temperature of 270 N/mm^2

Therefore preload at the point of embedding = 270 *40 = 10.8KN

So at room temp bolt preload without a washer shouldn’t exceed 10.8KN

The good news is the aluminium alloy increases yield stress etc as it cools, therefore if you avoid embedding at room temp it shouldn’t be a problem at the service temp.

This site mentions the aluminium alloy and states that the alloy improvs with cooling temp


“Do not worry about your problems with mathematics, I assure you mine are far greater.” Albert Einstein
 
Hi Andre3

So with a od of 12mm then :-

Pi*(12^2-7^2)/ 4 = 74.61mm^2

Therefore preload for embedding = 74.61*270 = 20.1 KN

Hope this helps

“Do not worry about your problems with mathematics, I assure you mine are far greater.” Albert Einstein
 
Torque + turn is the best intermediate tension control method as it directly controls elongation of the fastener independently of the lubrication of the threads and thread variation. Pick a torque that has only a small elongation but will elastically close any gaps and then the number of turns to produce the desired elongation.
 
desertfox
Shoot- the invar 36 I will use for the washers has a yield strength of 276 MPa so I am limited to 11 kN before the bolt will embed in the washer.

3DDave
I looked into this method and I think this will be our best approach, does ±15% error sound reasonable?


I realized that Inconel is actually a poor bolt material in this situation. The failure mode is separation of the joint, not bolt tensile strength, which means a less stiff bolt is desirable (decreases the joint constant).
Re-running the calculations for 316 stainless (A4-80 bolts), a 5mm thick invar washer, and an initial preload of 9.7 kN and after 10% relaxation that gives a separation force at 3 K of 8.212 kN. Custom inconel 718 bolts were going to cost about $5K with 4 week lead time, I can get stainless bolts tomorrow for 1% that cost. It seems counterintuitive that weaker bolts would be preferable, I am glad that I though to make the comparison.
 
Hi Andre3

Well at least we caught it in time (the washer I mean), what is the drop in preload within the bolt, I ask because the separation force for the joint is always higher than the bolt pre-load or should be. I take it that you have checked the stainless bolts for linear expansion coefficient etc when you ran the calcs again.

“Do not worry about your problems with mathematics, I assure you mine are far greater.” Albert Einstein
 
desertfox
The preload goes from 9.7 kN initially to 8.73 kN after relaxation, then from room temp to 3K it drops to 5.9 kN from the differential thermal contraction. The script I wrote with the NIST data makes switching between materials very simple so all of the correct material properties are applied to the new joint.

One puzzling thing that someone might be able to explain to me is how A4-80 bolts achieve so much more strength than what is listed for just 316 stainless steel. I can see that the compositions are essentially identical and from what I have gathered the elastic modulus and thermal properties are the same, is it just how they are treated? For this calculation I just need to be confident that the elastic modulus and thermal contraction match what is in the NIST database, I should be totally safe from yielding.
 
Hi Andre

Well with those figures it seems you still have some safety margin in hand.

I think the A4-80 bolts get their additional strength by being cold worked however that cold working can leave them slightly magnetic.


“Do not worry about your problems with mathematics, I assure you mine are far greater.” Albert Einstein
 
I feel like I am ready to submit the design:

-56 X M6x1mm 35mm length DIN 912 A$-80 socket head cap screws.
-Preload to 9.6 kN by first torqueing to 2.88 Nm (~2400 kN preload) in a star pattern then repeat turning 19 degrees.
-minimum factor of safety on joint separation at 4K = 1.96


I think I did the torque angle calculation correctly, but it is a first for me and I couldn't find a formula:

load/turn = combined stiffness * pitch = (kbkj)/(kb+kj)*.001 = 1.3684e5 N/turn

7200*(1/1.3684e+5)*360 = 18.94 degrees


Hi Andre3

Unless I am reading it wrong torquing to 2.88Nm is almost generating the preload you require at the end of tightening, I read 3DDaves post as setting a very low torque that just allows faces to contact each other ie “finger tighten nut on bolt” and then use the rotational angle to generate the preload, I think you are setting to high a torque at the first stage which will have all the friction error you are trying to avoid, also without the dimensions of the joint and the stiffness values you have calculated I can’t check the maths.

“Do not worry about your problems with mathematics, I assure you mine are far greater.” Albert Einstein
 
desertfox
T = (.2)*(.006)*(2400) = 2.88 Nm
2400/9600 = 25% of the preload

kb = 1.88e08 N/m bolt stiffness
kj = 5.03e8 N/m combined stiffness of the washer and aluminum
pitch = 1mm

For greased threads I have seen .2 as a K factor but please advise otherwise. 2.88 Nm (~25 in-lbs) is near the bottom of most common 1/4 drive torque wrenches but I could go as low as 2 Nm. The covers are not perfectly flat so I think I will need at least 1 kN to be sure the gaps are closed.


Hi Andre3

Okay I misread the units, however that 25% will be subject to an error of 25% and the turn of the nut angle method is +/-15% so if it were me I would reduce my first torque setting down to 5% or 10% of the required preload, that way the +/- 15% error on the final turning of the bolt angle method will be subject to a smaller error overall.
On the friction factor in my book is normal 0.2 for dry threads but here is a link for friction factor for bolt threads dry and lubricated
I will get back to you on the angle method of tightening shortly👍

“Do not worry about your problems with mathematics, I assure you mine are far greater.” Albert Einstein
 
desertfox

I see your point about the error, I will knock the initial preload to around a 1 kN if possible, thank you.
 
Do you have a tightening pattern established? I imagine you'll have to go around more than once at each stage
 
Status
Not open for further replies.

Part and Inventory Search

Sponsor