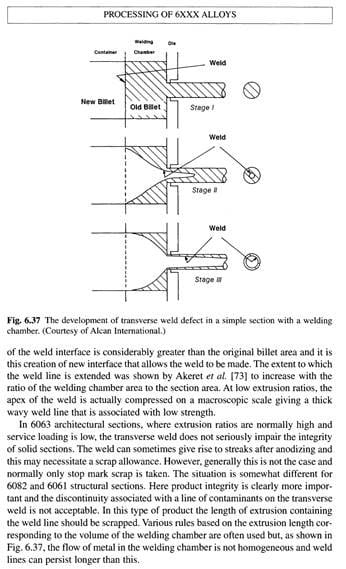
Transverse welds from extruding billets back to back was the situation I was alluding to in my last comment. In that instance, the butt was sheared off, then the next billet was put into the container and pressed (the billets were just joined by the pressure of extruding). Those transverse welds had the shape shown in the picture that Hill05 posted (kind of a parabola looking cross section). Each piece of extrusion will have as many welds as the number of billets extruded minus 1, so you'll have at least that many defect parts if they missed them all (if they used a multihole die, you'll need to multiply the welds by the number of holes). However, you'll likely have many more than that (if this is indeed a transverse weld defect) since the weld would be long enough to span many parts (judging by the lack of noticeable taper in your plug). As I said above, in my case the welds were strong enough to survive subsequent fabrication processes for the extrusion, so they had a decent strength to them, just not enough to be good product. The other piece that may be of use to you is that when the pieces with welds in them were cut open through the weld (either a cross section or an axial cut) and subsequently etched, you could clearly see the weld (with the naked eye) due to the difference in grain structure between the two parts of the weld. The line separating metal from each billet was very clear.
If this is indeed a transverse weld, then you'll of course need to pay special attention to the supplier's procedure for marking/detecting and then subsequently removing the defect, both in theory and in practice. If they want to use some form of NDT to remove the defect parts from this lot that's already been made, make them prove that the method is actually capable of detecting them, since the last time I looked in to this, detecting this type of flaw was not easy to do (although there could be better methods now).

