Continue to Site

Eng-Tips is the largest engineering community on the Internet

Intelligent Work Forums for Engineering Professionals

  • Congratulations cowski on being selected by the Eng-Tips community for having the most helpful posts in the forums last week. Way to Go!

joining shafts with milled features at a precise angle

Status
Not open for further replies.

CorryL

Computer
Jan 4, 2019
4
So, I admit, my formal training isn't mechanical, so I probably have no business doing mechanical engineering work...but, I am, and I've already invested heavily on the concept I'm working on, so that brings me here looking for what I hope amounts to some basic help :)

The story is one most mechanical engineers probably run into at some point, designing a part that's too long to be turned on a turning center. The machine in question is a haas st-20y with a tailstock but no steady rest provisions (though I could probably make one on the tailstock linear guides, but the tailstock guides only come to about 7" from the front of the chuck). Max shaft diameter is 7mm, length is 265mm. :D If I weren't the machinist as well the designer, I'd add a troll face.

I realized pretty early on, that wasn't going to work, and worse, I have 2 parts that need to be put on 2 separate 3mm sections enclosed by 7mm sections. Yeah, now I'm really trolling myself! So no matter what it has to be broken up into smaller pieces, and worse, broken at the most thin point of the shaft.

There is of course, a catch, as up to this point you're probably thinking about any number of standard shaft coupling methods (most simply an interference fit!) The catch is that there are features milled into "the shaft" that need to line up. so the angle of rotation of the shaft in joining must be controlled either by the joining method, or something else. This is why initially I was going to try to make it 1 part, 1 setup on the machine.

My thoughts on this were initially to drill/broach a hex hole, measure it, and then precisely mill a hex shape to match on the other side. The real difficulty started when I realized I was going to need to separate the shaft at the 3mm section because a part with a 3mm linear bearing (being used in rotation as well....don't know what else to do though, I need linear and rotational movement of the part) the hex has to be inscribed on the 3mm shaft end. I figured that to have any strength, it will need to sit deep inside the mating shaft...I just can't help but wonder what the professionals do in such a situation. (probably redesign....? unfortunately, bigger smallest section requires an even bigger larger section on the shaft, so it just makes the dimensions of the problem larger)

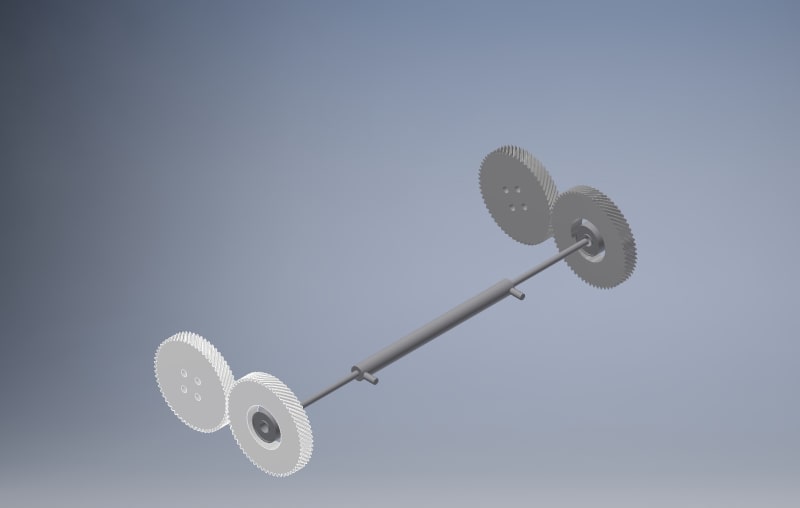
A few other points...There is a rotating assembly across most of the width of this, otherwise I'd break the shaft up and support it in 4 locations total instead of 2. The assembly is not heavy, and will be very carefully balanced. Shouldn't be a whole lot of radial load on the shaft.
Another point unrelated to the first "other point": I'm looking at making this from D2 tool steel that will be hardened, both for the bearing surface, and for strength. More than willing to hear about better options though :)
Last point unrelated to the previous 2, but still important. I know the life on this won't be great because of the (mis)use of the linear bearing, and the speed. 3mm linear bearings are very cheap though, and that's why I have the disassembly requirement :) As with all other points, willing to take suggestions! :)

I'm hoping someone with much more experience will see something easy that can be done. If I am on the right track, is there any other guidance you can offer? I'm willing to listen to even the most outlandish suggestions :)
 
Replies continue below

Recommended for you

Any chance you can provide a drawing of this part? I'm having a hard time trying to figure out what requirements you have where on this shaft...

Aidan McAllister
Metallurgical Engineer
 
Well, I don't have it fixed/finished as I realized I had some errors, but here is the gist of it....currently....subject to change a lot :D The key thing missing here is that the shaft has to extend beyond the gears to a fixture point. another 25-35mm or so.

I also remembered wrong....I think. Looks like the inner bore of those bearings is 5mm not 7. That may have been a typo in my rough model. I'll go check it out :) Things are changing a lot still.

veryrough_typ8wi.jpg
 
You seem to be ignoring a fundamental part of any system development, the make/buy decision. It seems to me that you could send out the work.

Alternately, a drawing would help, but I wonder what's so critical about your "features" that couldn't be done AFTER the shaft is coupled.

[edit] Sorry, your image didn't show up until after I posted. I presume that the issue is with the alignment of the gears, which suggests that you should install the coupler and the shafts with the gears attached to get the shafts aligned. Tighten down the coupler and pin the coupler to the two shafts

TTFN (ta ta for now)
I can do absolutely anything. I'm an expert! faq731-376 forum1529 Entire Forum list
 
What's so hard about putting a long shaft on a lathe?
 
well, like I said, this isn't 100%. Right before the gears, there is another pin on each side. Those pins' alignment is the critical part.

I'm perfectly willing to machine then join, or join then machine. Disassembly is one issue, as I'll need to be able to get in and remove a rotating part off the 3mm sections. The trouble with assemble then machine is the length:diameter ratio. the part is 38 times longer than its diameter. Support is needed at 7? IIRC, and special support at 11? again IIRC. I thought about centerless grinding, but then the assembly/disassembly issue is still there, and I don't know if they'd like dealing with those pins :)

I know I've backed myself into a corner here. I'm still trying to figure out an alternate solution through redesign, but I don't see a way for the assembly/disassembly issue to go away. Those vertical pins are basically a cam mechanism. One on each side to provide motion in both directions. That motion has to have pretty precise control, which is why their alignment is the issue.

I've also considered making a jig for alignment, shrink fitting and using destructive means for disassembly and replacement of destroyed parts for reassembly. That's certainly less than ideal :)
 
Based on what I see, I would calculate torsional deflection before getting too wrapped up in that design. That thing looks pretty springy.
 
" Support is needed at 7? IIRC, and special support at 11? "
"Looks like the inner bore of those bearings is 5mm not 7 ."
"The key thing missing here is that the shaft has to extend beyond the gears to a fixture point. another 25-35mm or so. "

Please refer to AidanMc's post.


regards,
Dan T
 
Mill one end to how you like it.

Turn the other end round with a 63-125 micro-inch finish.

Turn a collar that is 0.001 - 0.002" larger ID than the OD of the shaft, and put a collet via saw cut on one side. Put a 63-125 micro-inch finish on the ID. Hold it in place with a shaft collar around the collet feature and verify that you have correct alignment. After alignment is verified, braze the collar to the shaft and remove the clamp. Voila - easily installed with a torch, easily removed with a torch and easily adjusted before brazing. Alternatively, you should be able to braze the spur gear directly to the shaft if you like.

Engineering is not the science behind building. It is the science behind not building.
 
There have been a lot of good reply's and issues brought up. I want to address them all, but it makes for a long post, and none address the issue directly, nevertheless, I don't want you all to think I don't appreciate the input. Just let me know you appreciate the time I put in to addressing them by reading everything. I've rewritten this post about 20 times now, and its always long. I've been sitting here for 3 hours trying to be concise, but responses are all over the place. I went ahead and updated the drawing to look closer to a final part, and clearly demonstrate the issue at hand. Since just using the "Image+" button above on the editor seems to be causing some people to not see the image, I'll attach it to the post as well. (Actually, I already did that, and erased the original link with the Image+ button...hopefully I'll remember to do that again at the end!)

Ok, first, because its the easiest issue. Turning a long part, or more precisely, a part with a high length to diameter ratio. Many probably know this, and I had my ratios off by a little bit (I thought they weren't nice even round numbers!), but there are significant cutting forces placed on a workpiece, especially when roughing. This force is induced as a moment to the part when its not acting right on top of support (impossible by definition). The further the tool is from support, the worse it gets. It may seem unlikely, but even a 1" diameter part sticking out the full distance between centers on my machine (19" IIRC for an ST20Y?) can bend from the cutting forces. Generally less than 5:1 needs no support. 5:1-10:1 can be done with just a tailstock. More than that, and You'll need intermediate support with a steady rest, and possibly a follow rest. I had said 7 and 11, hah, now that I put them together I see the cross link in the memory :) That was wrong. The 38:1 is where the part is currently, evident in the picture in my second post, or the third one from the top.

flimsy: yes, I'm aware. If its not rigid enough to turn, its going to be flimsy. I don't work sequentially like it seems most other engineers do. I have the variables in my head and work them in the order that makes sense to me at the time. I had suspected I can make those 3mm sections 6, but didn't prove it. It was inconsequential to what I was working on. Well, just for you I proved it out. That doesn't help much, but to deal with the flimsiness, here are the other variables I'm holding in my head. I can shorten the most thin sections, perhaps by as much as half, though that's probably a greedy estimate. 1/3 is more likely. I can shorten the center section as well, though it will have an impact on the results of the test of the system. I can thicken the center section, but its dead weight, so I'd prefer to keep it as thin as possible. Mass attached to the axle has been minimized as much as possible to reduce radial loading from imbalance. The shaft does not rotate, so its irregular shape will not contribute to any imbalance. The rotating section will be balanced to whatever precision I can attain through lots of frustration....I generally setup my machines to 0.0001" or less precision, so I can take a lot of frustration. Yes....I know, that would be considered wasteful at a job shop. Finally, materials. This is why I mentioned heat treated D2 steel. D2 seems pretty good in strength and rigidity. I'll have to send it all off for proper hardening, but that's not a big deal. This is why in my original post though, I had said, if you know of a better material, I'm willing to change. Don't even mind exotic materials, as long as they are attainable without having to buy a full factory run....(7068 aluminum I'm looking at you! not for the shaft, but for an example in the difficulty in acquiring!)

Braze the gear to the shaft: Sorry, should have mentioned in an earlier post, but the bearing on the shaft inside the gear, and the irregular shape around its axis made me think it was obvious, the shaft is stationary. the missing space between the gear and the bearing is a gear carrier. Showing everything would hide much of the shaft, which is what I came here for :) Also, I won't be planning on brazing anything to that shaft as I plan on having it hardened.

lessrough-more_details_um8zwq.jpg


Ok, that out of the way. The part in the image is not machinable on a turning center. Even if it was, it wouldn't allow assembly. So it has to be broken into at least 3 pieces. I think, breaking it into 3 pieces, at the places shown, each piece can be machined in 2 setups. Complicated, but not overly so. The issue is the alignment of all of those pins. Also note, the 3mm sections can be made into 6mm sections as discussed above in the flimsy section. other lengths are likely to change before the final part is made. No matter how short, this doesn't get around the need to assemble a bearing onto the thin section. So it has to be broken at the points the arrows point to for assembly reasons.

The question eating at my mind is how would you go about joining the shaft sections such that the pins sticking out of the shaft remain aligned?

Currently, I'm trying to keep those "pins" as part of the shaft, not pressed in pins. That could also change if it resulted in a significantly easier solution.

I'm also not looking for every problem to be solved with this part. I appreciate the help though. I just don't want to stray too far afield and miss the main issue.

To give you an idea, in addition to the hex machining mentioned, I've also considered press fitting with some sort of accurate sliding jig, though I have no idea how I'd make the beast. Getting the distance to sink in precise would be difficult. If that's off, the balance of the system will be much harder to achieve, and it may affect results of model testing. Threading, and ordering some custom 3, or now well, 6mm shim stock for timing like they'd do with a muzzle device on a gun, and using a gauge for determining accuracy of alignment, but then I'm unlikely to get my linear and rotational positioning to line up...unless I timed the threading perfectly...not sure that's even possible...square broaching/milling instead of hex. I don't particularly like any of them. They all have pitfalls.


Where are the bearing surfaces of the 2x shafts??

The load points appear to be only the 4x gears points, right?

The bearing surfaces (locations and lengths and types of bearings or sleeves) control what the rest of the shaft will deflect, what the twisting forces are and what magnitudes the deflections will be, where they they will appear as movements.
 
I assume the pins are meant to toggle or push something in synchronicity. Typically, that requires a hard material, while the shaft is probably not.

Nevertheless, it seems to me that an alignment jig which has a linear trough to align the pins would be the simplest approach; you drop the assembly such that the pins go into the trough and tighten down all the fasteners.

TTFN (ta ta for now)
I can do absolutely anything. I'm an expert! faq731-376 forum1529 Entire Forum list
 
Is using square or hex shafts a possibility?
 
Would it be possible to use 3mm (or whatever your smallest diameter section is)precision rod stock and have the center section be a hollow sleeve, held in place by set screws to flats on the rod stock? You could do the same thing on the ends as well. This way your biggest current concern about turning a long flimsy shaft is addressed.
 
Status
Not open for further replies.

Part and Inventory Search

Sponsor