Eng-Tips is the largest forum for Engineering Professionals on the Internet.

Members share and learn making Eng-Tips Forums the best source of engineering information on the Internet!

  • Congratulations JStephen on being selected by the Eng-Tips community for having the most helpful posts in the forums last week. Way to Go!

GD&T question on position

Status
Not open for further replies.

ESTinker

Mechanical
Joined
Aug 24, 2017
Messages
40
Location
US
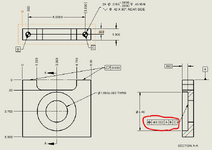
Is this valid? I don't think it is valid since it's not a feature of size would replace it with a perpendicular with datum A or a flatness instead but I don't have enough experience with GD&T.
1740750820038.png
 
Last edited:
In ISO position can be used on surfaces, but that would not involve the diameter modifier on the tolerance zone.

If it was profile of surface, the diameter modifier would not be appropriate. If the surfaces used for datum feature A, not correctly called out here, are convex then it could provide a range of acceptable parts that are unlikely to be what was intended. "Acceptable" is a QA/QC evaluation, not whether the parts are useful.
 
I suspect they intended it to be applied to one of the holes (the thru-hole or the counterbore).
 
There isn't a basic dimension to either the counterbore or the through hole and the Feature Control Frame would have been best co-located with the controlling diameter dimension.

It would be helpful if the standard was $15 and so more people would buy a copy and, maybe, read it.
 
I agree with all the other comments. Especially the $15! I am always surprised to see how widespread the application of position tolerances has become. I always just use it for holes. I agree with you that perpendicularity and/or profile (depends on function) is fundamentally better in this case.
 
late in the game but I am bored.
the drawing is incorrect.
but the intent is to hold the counter bore face.
instead it should have been profile
 
Status
Not open for further replies.

Part and Inventory Search

Sponsor

Back
Top