[ol 1]
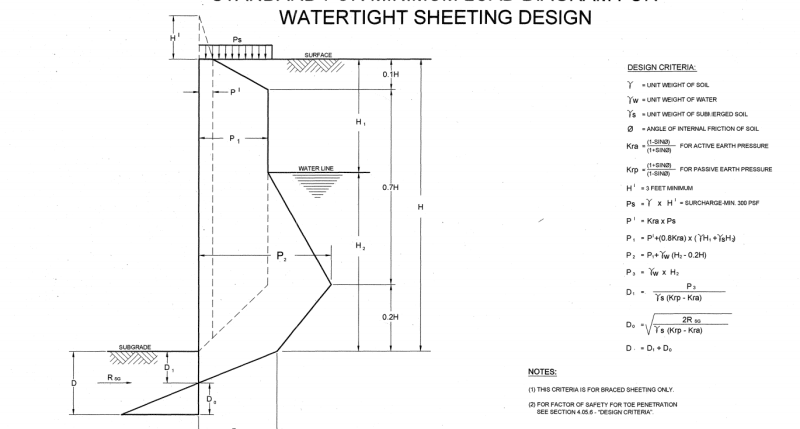
[li]Draw separate pressure diagrams for the earth pressure, water pressure, and surcharge pressure.[/li]
[li]Calculate the trapezoidal pressure diagram above subgrade for the retained, stratified(?) soil(s) considering the relative amounts of moist and buoyant soils.[/li]
[li]If you do not know how to derive the trapezoidal earth pressure diagram for stratified soils with a water table, you should not be designing this wall.[/li]
[li]I recommend that you read AASHTO's Bridge Design Manual section on anchored walls.[/li]
[li]Calculate the theoretical soil pressure acting on the wall below subgrade, considering the retained soils as a surcharge on the soils below subgrade.[/li]
[li]Chose elevations for your 3 braced wale levels - A, B, and C.[/li]
[li]Cut the wall and the pressure diagrams at Level B and Level C.[/li]
[li]Label the B level reaction as B1 for the upper section diagram and B2 for the middle section diagram.[/li]
[li]Label the C level reaction as C1 for the middle section diagram and C2 for the lower section diagram.[/li]
[li]The lower diagram should include the driving pressures below subgrade and the passive pressure in front of the SSP wall.[/li]
[li]Take the upper diagram section and take moments about B1 to find A reaction.[/li]
[li]Sum the forces in the upper diagram to calculate B1 reaction.[/li]
[li]Calculate the cantilevered and interior moments for the upper wall section.[/li]
[li]Repeat this process for the middle section.[/li]
[li]Calculate B2 and C1. B = B1 + B2.[/li]
[li]Calculate the interior moment in the middle section.[/li]
[li]Label the SSP embedment depth as D (an unknown) with the pressure diagrams applied to the appropriate sides of the SSP toe.[/li]
[li]The driving pressure moment for D embedment must equal the resisting moment for D embedment.[/li]
[li]Take moments about C2 and solve for D with moment equilibrium.[/li]
[li]Knowing D, sum forces in the lower wall section from C2 to the SSP tip with D embedment. Driving forces - resisting forces = C2.[/li]
[li]C1 + C2 = C.[/li]
[li]Find point of zero shear in a wall section. Maximum moment in any wall section occurs at the point of 0 shear in that section.[/li]
[li]Now you know the three level reactions and the moments in all three partial wall sections - top, middle, and bottom with embedment.[/li]
[li]Chose a SSP size that can resist the maximum bending moment.[/li]
[li]Increase D calculated for moment equilibrium by at least 20% as a safety factor on the passive resistance.[/li]
[/ol]
This process is shown in many reference books. If you don't understand the above steps, you should not be designing this wall.
I recommend that you read AASHTO's Bridge Design Manual section on anchored walls.