Continue to Site

Eng-Tips is the largest engineering community on the Internet

Intelligent Work Forums for Engineering Professionals

  • Congratulations Toost on being selected by the Eng-Tips community for having the most helpful posts in the forums last week. Way to Go!

Assembly Bitemare. 1

Status
Not open for further replies.

itsmoked

Electrical
Feb 18, 2005
19,114
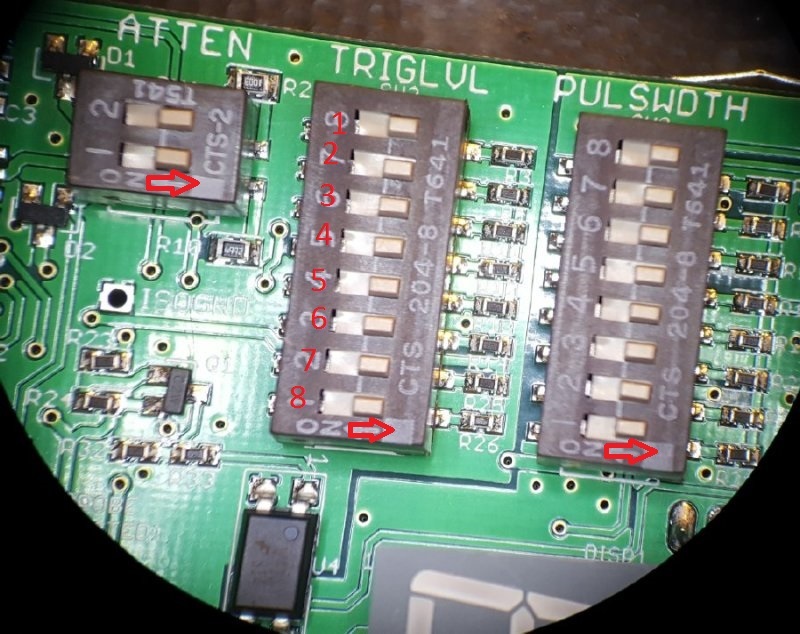
See these simple dipswitches?
All three of them?

20170226_022648_dkbh4p.jpg


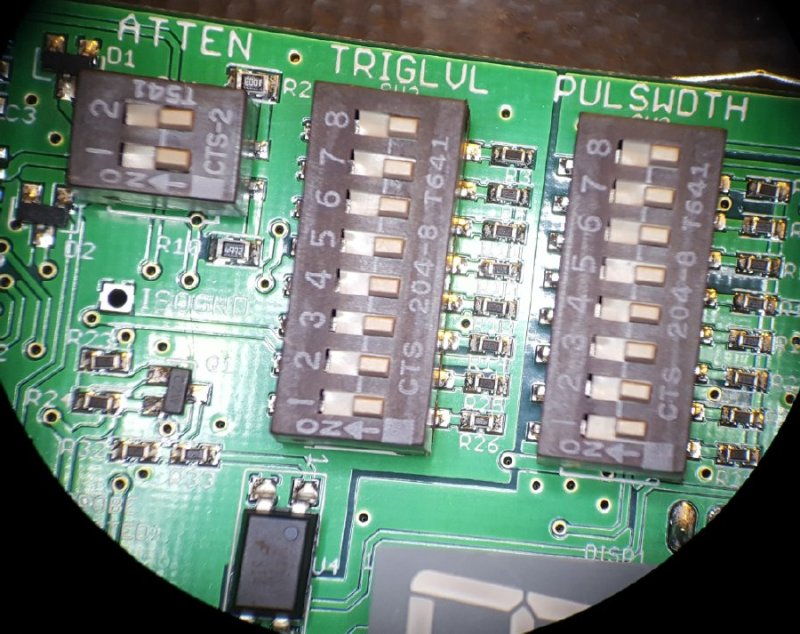
They are the same on ten boards.

They're backwards.
URL]


I need some suggestions on how to remove them, preferably keeping them intact so they can be re-installed correctly. Normally I'd just cut all their leetle feets off and be done with it, but I actually can't get to the feet in between with cutters.

I have a hot air pen but there is no way it will heat all 20 pins at once.

If I put them in the reflow oven everything will be roasted again and the bad thing is that in the scope of it all those partially shielded pins are the last things to melt.

Ack! and these are double sided boards so all the bottom parts would fall off.
URL]


Keith Cress
kcress -
 
Replies continue below

Recommended for you

Dremel disc, cut them in half, remove each side separately? You lose the switches but I guess the board is worth a lot more than the switches.
 
Another vote for the Dremel disc and new replacement switches.

Bill
--------------------
"Why not the best?"
Jimmy Carter
 
Very big thanks to all of you!

The switches are so close together that I'm just not sure I can get to the pins with wick and larger wick-driving tips without melting some switch sides which would require buying some anyway, same with a blade tip. My favorite of solder-blobbing would probably suck a lot of those resistors into the maelstrom too.

Someone suggested trying to disassemble the switches and reassembling the tops reversed, then I saw that these are "epoxy sealed".

I hadn't thought of the Dremel. The cost hit isn't as bad as I thought, $35 for the switches - the $60 for quick shipping is pretty dang painful but I could see trying other methods as being much more labor intensive (>>$60).

I have one of those Dremel cable extensions that make fine work easier. I can also use an end-mill in the flavor of the Samsung Washer Controls repair detailed elsewhere here.

I wonder if ten boards would warrant doing a CNC router program to mill them all off.. hmmm.

Well I'm off to hack them. Thanks again.

Keith Cress
kcress -
 
Correct me if I'm wrong, but isn't it just a matter of flipping the outer casing 180º? Do the switch handles have to have a particular sense?

Seems like you could just cut the cases out, flip them, and glue them back down?

TTFN (ta ta for now)
I can do absolutely anything. I'm an expert! faq731-376 forum1529 Entire Forum list
 
"epoxy sealed"

The switch is epoxied together so there is no way to disassemble them.

The Dremel was unworkable, grinding wheels barely touched the feet.
A diamond burr barely touched the hard brittle switch bodies, it would take hours and hours.
A Dremel saw-wheel proves just too nasty and uncontrollable.
A jeweler's file too thick, it's going to take the tops off the surrounding resistors.
A jigsaw blade to thick too.

In desperation went for the basic Swiss diagonal cutters and tried to get under the outside pins. Very hard but I'm able to cut some of the feet. When I get about half of them cut the other feet just pull out of the solder. I can then bend the switch up and easily cut the far feet.

Took 1.5 hrs to cut them out and clean off all the left over feet.

Done.

Now waiting for the replacements.


Keith Cress
kcress -
 
Can you crush the switch package with pliers?
The idea is to destroy the switch so that the feet may be removed individually.
With the dremel, I visuallized cutting the switch down the center so that it could be disassembled.

Bill
--------------------
"Why not the best?"
Jimmy Carter
 
Keith,

Remove all excess solder from each pad. Mount the PCB sin a holding jig and run a piece of magnet wire under the switch bodies. Tie the magnet wire down on one side. Pull the other end towards the tied down side, heating each leg of the switch in series. If done correctly, the magnet wire wipe under the pin and will break any solder bridge, preventing it from tacking back down. Once you get a rhythm going, you can do long strings of QFP pins in a few seconds.

Dan - Owner
URL]
 
Yeah Bill, that was my thoughts too. Intrigued by Dan's idea though - not for present-day work, but an interesting solution to problems from the past. :)
 
Thanks Dan - it's a few years since I've done electronics repairs at work, two jobs ago I think. Now I get to fill in forms, attend meetings and write procedures. :-(
 
I like that Dan!
The switches are fairly tall as SMDs go.

I'd have tried it if I wasn't done. Now I have a pile of dead switches.

Keith Cress
kcress -
 
I'd try a generic heat gun like you would use for heat shrink tubing. The heat distribution will be large enough to heat the entire switch but shouldn't be too hot for the other components. I've had good luck with this technique.

Z
 
"My" SMD guy uses a heat resistant tape to protect nearby components. And then uses a suitable orifice (DIP, Quad etc) together with the hot air gun. He is really quick and no damage so far. Not even to LCD displays only a few mm away.

Gunnar Englund
--------------------------------------
Half full - Half empty? I don't mind. It's what in it that counts.
 
!! Metal tape!! That would've worked great with my heat gun.

Took me 2 hours to solder all the switches back on. I marred a LED display so I had to switch it out too - more work. Luckily I had about 30 spares of those.

Then I had to wash all the boards for a THIRD time, blowing them all off and soaking my pants (again).

Now I'm heading back to test these things.

Keith Cress
kcress -
 
Status
Not open for further replies.

Part and Inventory Search

Sponsor