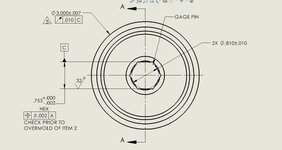
Diametrix, are there other features on the part which define angular orientation? I'm guessing not because it looks like a simple threaded plug. Otherwise, if datum C is only 1 pair of opposing flats (per Burunduk, and as I also initially thought), you'll never know which of the 3 pairs it is. 3 people could inspect the part and set it up differently on the 3 different pairs of flats. I agree that the HEX note adds something and indicates that the linear dimension applies to all three pairs of flats. I think that the gauge pin note also implies that the axis of the pin should be used as the datum, but that might not align with the "official" interpretations according to the standards.
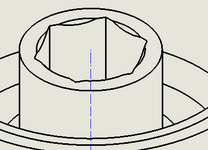
There is another potential problem here. It appears that the hex is broached into the part after a 0.810" pilot hole is drilled. This means that the flats will not be complete. The middle material will be missing. Only the 6 vertices/corners will have the actual flat. This works fine for driving the part by a hex key, but it does not facilitate inspection of the part's flats. It will be challenging to register any gauge confidently to the flats. Any gauge pin used will not touch the 6 hex flats (theoretically), but will actually touch the pilot hole diameter. It appears to be drawn with a different expectation, as the gauge pin diameter is aligned with the flats. Is there a section view available on the center axis of the part?
Is it correct that you are not the designer of the part, but rather the inspector of the part?


