can you please show me the work around to make the hole?
Here's how I made the counterbored hole:
1. I modeled the rest of the part, leaving the counterbored hole for last. Based on the drawing provided above, the dimension of the hole is: "1 HOLE Ø8 CBORE Ø10 DEPTH 5"

2. based on the axis system shown in the images, I added a Point with coordinates x=70, y=27+19, z=8 to define the centerpoint of the hole
3. I added a plane at the front of the part (x=70), and another plane at the height of the point (z=8). These will be reference planes for the next step

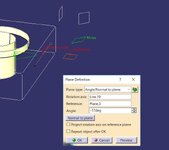
4. referring to the top view in the drawing, I added a vertical line through the point. I then added an angled plane through the vertical line at an angle of 50°. (+50° looked wrong, so I used -50° instead) And I moved this plane so I could easily see it.

5. I repeated step 4, with a horizontal line and I added a second plane at an angle of -17°

6. Intersecting these two planes will create the centerline of the counterbored hole. I changed the line Properties to make this line easy to identify. Rotate the model to look at it from the top and side to verify the line's compound angles are correct.

7. Now I added a point for the depth of the counterbore (5mm) from the centerpoint.

8. Then I added a plane normal to the curve, as shown above. I also Hide the lines and planes that were cluttering up the screen.
9. Using the normal plane as the support, I added a circle for the hole size (R=8/2)

10. then I added a second circle (same centerpoint, same support) with a R=10/2 for the counterbore.
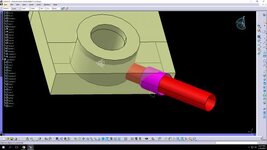
11. Extrude both of these circles to get the cylindrical surfaces of the counterbored hole. The length isn't important as long as both surfaces extend beyond their limits

As you can see, the Ø8 cylinder extends down and breaks through the bottom of the part. We'll keep the 4mm radius to follow the dimension on the drawing and model the actual shape.
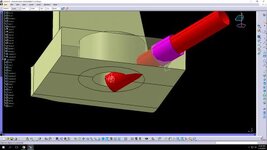
12. Split the Ø10 cylinder with the plane at the front of the part (the plane might be hidden). Click on the OTHER SIDE button, if you get the wrong side

almost done, but I have too many pictures in this post, so I'll have to continue this in another post.


")