sendithard
Industrial
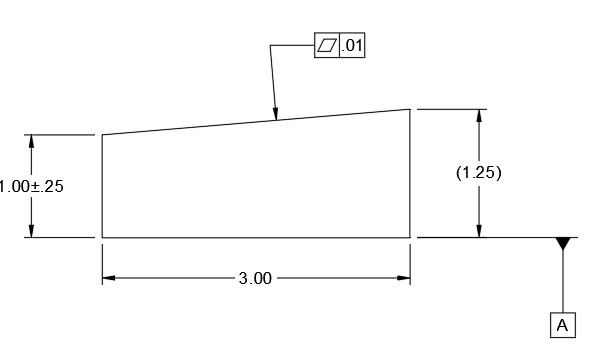
EDIT: the below drawing is representing the final machined part, a perfect part would be a perfectly square 1-2-3 block, datum a just represents the surface plate method.
I'm learning the CMM now and the GDT is really hitting home now, thanks for all your help in the past.. I get tripped up from time to time and the below issue is really bothering me.
Flatness....I was taught manual inspection on a surface plate. If we inspect a 1-2-3 block, you place it on the surface plate(datum A touches the plate) and run a dial indicator over the top surface. The dial min vs max is your flatness amount.
Now my mind wonders why the above method is wrong...if someone machines a part with a top surface so bad that it maximizes the plus/minus height tolerance, but the top has a nearly perfectly ground surface, you have a part that is bad, but within the plus/minus height tolerance...and is well within a flatness tolerance due to it being almost a ground like surface quality. BUT if I check flatness on the top feature by placing the bottom on the surface plate, I am going to get a massive 0.25 variance on the min max dial indicator. What is the appropriate way to measure flatness outside the CMM and on a surface plate? Am I confused?

