Tek-Tips is the largest IT community on the Internet today!

Members share and learn making Tek-Tips Forums the best source of peer-reviewed technical information on the Internet!

  • Congratulations cowski on being selected by the Eng-Tips community for having the most helpful posts in the forums last week. Way to Go!

Give different appearances to a piece

  • Thread starter Thread starter AlexLL
  • Start date Start date
A

AlexLL

Guest
Hello and good morning.
I am drawing a desk in Solidworks.
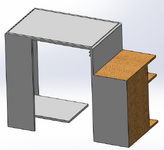
But I can't give the wooden appearance to the item at the left totally.

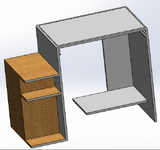
You can see how the front faces of the shelves are gray and also the reverse side is gray, and If I try to give wood appearance to it, all the piece gets wooden.
I tried some operations but they didn't work, so I searched for help.

If someone can tell me what can I do to give two appearances to one piece, please? Thank you.
Example_1.pngExample_2.png
 
As you may know you can choose to set the appearance on faces, features, bodies or the whole part. It looks as though all your features are merged together, hence its one face, which is why it all changes

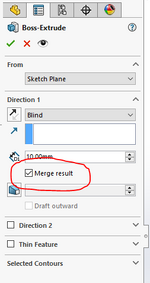
When you do your extrudes you can choose not to merge

1589559167818.png

You would then be able to colour the bodies or faces separately.

Or you can split faces to colour them individually by using Insert - Curve - Split Line (or use the scribe of a wrap function). Doing this will still mean its one part though so instead you may want to actually split it into several bodies using the Split command Insert - Features -Split (this can be with a curve, or maybe more convinient a face).

A top tip from me, if your are doing furniture you may find it beneficial to treat your part as a weldment from the start (insert Weldments - Weldment).
This has the advantage that extrudes by default will not be merged and also you can get a cutting list. Hope this helps
 
As you may know you can choose to set the appearance on faces, features, bodies or the whole part. It looks as though all your features are merged together, hence its one face, which is why it all changes

When you do your extrudes you can choose not to merge

View attachment 2493

You would then be able to colour the bodies or faces separately.

Or you can split faces to colour them individually by using Insert - Curve - Split Line (or use the scribe of a wrap function). Doing this will still mean its one part though so instead you may want to actually split it into several bodies using the Split command Insert - Features -Split (this can be with a curve, or maybe more convinient a face).

A top tip from me, if your are doing furniture you may find it beneficial to treat your part as a weldment from the start (insert Weldments - Weldment).
This has the advantage that extrudes by default will not be merged and also you can get a cutting list. Hope this helps
Thank you. You solved my doubt. Regards.
 

Part and Inventory Search

Sponsor

Back
Top