Oaklandishh
Mechanical
- Sep 3, 2014
- 48
I am looking at a drawing made by a US company in 1975. I cant find a reference to any drawing standard.
there is a note regarding flatness that reads as follows:
"DEVIATION FROM VERT TO BE WITHIN .005 TOTAL FLATNESS. TOL FOR SURFACE [a bunch of surfaces] TO BE WITHIN .002 TOTAL (MAX .0002 IN/IN.)"
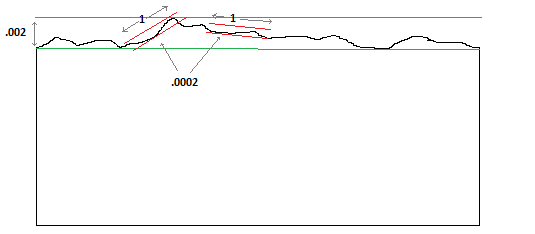
I am thinking this should be interpreted similar to how per unit flatness is specified in ASME-Y14.5M-2009 which I think is similar to the picture below where there are infinite .0002" apart 1"^2 flatness zones within the full parts .002" flatness zone:

Am I misunderstanding this?
there is a note regarding flatness that reads as follows:
"DEVIATION FROM VERT TO BE WITHIN .005 TOTAL FLATNESS. TOL FOR SURFACE [a bunch of surfaces] TO BE WITHIN .002 TOTAL (MAX .0002 IN/IN.)"
I am thinking this should be interpreted similar to how per unit flatness is specified in ASME-Y14.5M-2009 which I think is similar to the picture below where there are infinite .0002" apart 1"^2 flatness zones within the full parts .002" flatness zone:

Am I misunderstanding this?
