Continue to Site

Eng-Tips is the largest engineering community on the Internet

Intelligent Work Forums for Engineering Professionals

  • Congratulations waross on being selected by the Eng-Tips community for having the most helpful posts in the forums last week. Way to Go!

Beginner question runout location check and A-B

Status
Not open for further replies.

sendithard

Industrial
Aug 26, 2021
186
I'm new, but have a decent grasp of gdt. Here are my roadblocks now. If you have a cylindrical part and one smaller OD lists simply a runout tolerance to the larger OD surface, what tells the inspecting individual where to check this part? They could check the best location and say pass, and 3 inches further away it's .020" off? Then I don't understand what A-B means vs when A and B are in their own square. Thanks so much.
 
Replies continue below

Recommended for you

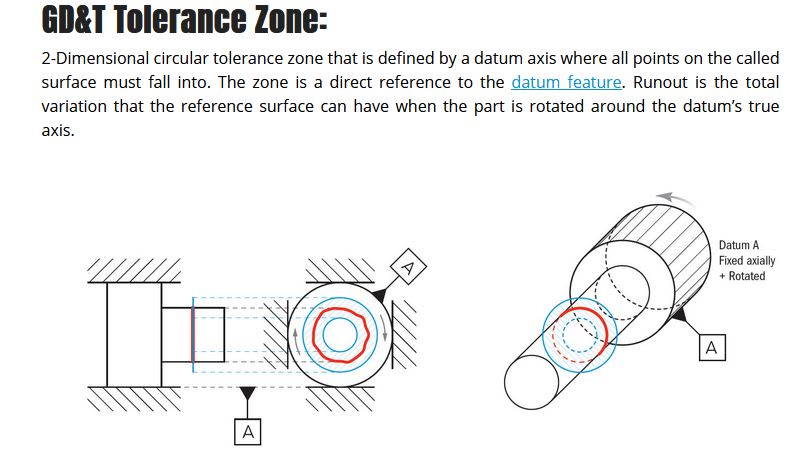
Circular runout applies to every individual section along the surface it is applied to; each section along the surface has to meet it to pass.
 
3d,

If you have two coaxial cylindrical surfaces and both are 1" long, a very simple lathe part. Are you saying to pass inspection with only circular runout listed it would need to be measured at various points along its surface? How does this differ from total runout then which I was under the impression that you also measure various points if not the entire surface? Thank you as I just don't quite understand the real diff b/w the two.
 
The pic below conveys my question better. You have a REAL surface in red and you wrap this around with a tolerance zone of .030" Stay between that zone and you are a winner. Well it seem like with circular runout you must measure many points along that surface instead of picking just one, technically the entire surface must meet this .030" zone req.


Now we have a total runout callout of .030" with the same datum features called out. My understanding is you must once again stay within this cyclindrical zone of .030" the entire surface. This makes me wonder how these are different. They seem identical to me. I know I'm confused I just need to be slapped with a dead fish until I get the difference. thanks so much.


Capture_fkq0yx.jpg
 
Suppose the part is to have a circular runout of 0.001 inches, but a size tolerance of 0.500. Under the circular runout the part diameter could taper from the smallest size to the largest size as long as it runs smoothly. If it was total runout then that size variation would be clipped to be within the total runout variation. The taper would be very limited by total runout where it is not under circular runout.
 
I'll submit an actual drawing tomorrow. I don't understand what you are saying. I can't do an example with a size tolerance of 0.5" in my brain. much love...
 
Really? If I say it's Dia 2 inch +/-.25 and a guy with a lathe sets up crooked and cuts a taper from Dia 1.75 to Dia 2.25 but every section is perfectly circular, then it passes each circular runout and fails total runout.
 
what tells the inspecting individual where to check this part?

All points along the surface(s) with the applied GD&T control must satisfy the tolerance zone. Its up to the inspector to determine which points should be sampled to provide a high confidence that the surface is well represented.

Then I don't understand what A-B means vs when A and B are in their own square.

You seem to be mixing concepts here. A-B is the notation for Multiple Datum Features, though it doesn't seem like this is what you're actually asking about. If you are, please clarify.

Well it seem like with circular runout you must measure many points along that surface instead of picking just one, technically the entire surface must meet this .030" zone req.

Now we have a total runout callout of .030" with the same datum features called out. My understanding is you must once again stay within this cyclindrical zone of .030" the entire surface. This makes me wonder how these are different.

Just to add to what 3DDave is stating, put simply Circular Runout says the points in EACH circular section of a surface must satisfy the tolerance SEPARATELY (tolerance zone is two concentric circles separated by the amount specified in the tolerance), Total Runout says the points in ALL circular sections of a surface must satisfy the tolerance SIMULTANEOUSLY (tolerance zone is two concentric cylinders separated by the amount specified in the tolerance). As a result Total Runout is more restrictive.

For an example of a part that satisfies one and not the other, I'll paste one of the most often referenced articles in this forum.

 
 https://files.engineering.com/getfile.aspx?folder=fbec08e0-28ff-42f6-8fc1-75f22601bb45&file=newsletter_-_pass_fail_-_concentriciy_runout_and_position.pdf
3ddave & chez,

It took me a while, but I understand the difference now. Thanks. Once I saw that paper you linked to and then revisited the points dave was making it sunk in.
Total runout has a memory of the highest and lowest point. It takes runout to an additional level of seeing how far the local measuring spot in 2d has deviated from other points. This in effect adds in the 3d component and in your examples the extreme shift in diameter, yet within tolerance, causes a fail on the total runout but a pass on circular runout. Thank you.
 
Status
Not open for further replies.

Part and Inventory Search

Sponsor